Origins of our sundial
Step 1: Calculation
The most important tool to build a precision sundial is the mathematical description of the astrophysical processes. Wikipedia helps with the corresponding formulas when searching for keywords like sun path, position of the sun, equation of time and the pages linked herein. Eventually you will need the position of the sun (azimuth and elevation) at your geographical location as a function of time. The projection of a fixed point (nodus, aperture) onto a plane (dial plate) then is just a small mathematical exercise.
A software to do the calculations is essential because many of these are required to calculate the scale to be painted onto the dial plate, and they have to be done without error or typo. There are many free and commercial programs available for this purpose. However, with just a few basic programming skills it is a simple task to translate the mathematical formulas to executable code. That's the way I did it, here is a screenshot of my own sundial calculation software.

Step 2: Measurements
In order to reach the required precision of less than one minute the orientation of the dial plate has to be adjusted to a deviation of less than 0.1 degree from the exact orientation. This means that the orientation of the wall on which the dial plate is to be mounted needs to be measured with this precision because a wall mounted dial plate cannot be adjusted after mounting. (In my case the mounting support structure allows for a slight adjustment of less than one degree in each direction).
Using a compass would not give the required precision nor would a reading of the wall facing direction from construction drawings or aerial photograph do. The simplest and most feasible solution is to fix the exact local north direction and the measure the angle between the wall direction and the exact north direction where the required precision can easily be achieved using standard measuring equipment and a little bit of mathematics. Fixing the exact north direction is just as simple using the shadow cast by a plumb line. This is exactly the way a sundial measures time.

From the geographic coordinates and the exact time of the measurement the position of the sun given by its azimuth and elevation can be calculated. From the direction of the shadow casted by the plumb line and the sky position of the sun the calculation of the exact north direction then is a simple task. Possible measurement errors can be reduced and the precision improved by repeating this process several times at different dates and times of the day.
All of this only applies to the azimuth direction of the wall face only. The elevation angle of the wall cas be measured easily using a plumb line. This just in case you don't trust the bricklayer to have fabricated a truely vertical wall.
Step 3: Construction and manufacture
Aside from the exact orientation of the wall which will carry the dial plate one will also need the geographic location of the installation site. This can be determined easily using a GPS device or it can bee looked up on the internet, the precision doesn't need to be that high so there means are sufficient. Using the sundial software then the scale on the dialplate can be calculated. The position and length of the nodus in relation to the dialplate define the size, position and visible section of the scale. By selecting and fixing these design parameters one has finally fixed the scale to be printed on the dial plate. Finally use your fantasy to add a legend for the datelines and hourlines, a motto, the signs of the zodiac and more ornaments or other design elements.
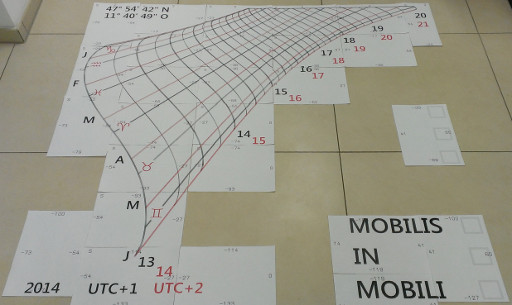
This picture shows a draft sketch of the dial plate design of my sundial in its original size, printed and layed out on the floor.
The drawing of the scale finally has to be transferred onto the dial plate to be manufactured. I used a dial plate made from aluminium and engraved all the lines and elements before applying color. Using this approach the dial plate can be sanded and repainted at a later time if necessary without loosing all the positions of the lines and design elements.
This picture shows the dial plate at the stage of engraving the lines. The transfer of the line positions from a 1:1 print of the scale is done via carbon paper.